Ad labels are small, customizable markers placed above your ads that signal transparency, maintain compliance, and help users immediately understand that the content is paid. The following guide walks you through setting up, fine-tuning, and styling these labels using AdPresso’s flexible three-level hierarchy, with practical examples for customization.
Before creating or adjusting any labels, make sure the feature is enabled globally. In your WordPress Dashboard, go to AdPresso > Settings > General and locate the Ad Labels section. Turn the module on with a single toggle.
Once the module is active, you can define your global default label text. This will automatically apply to all ads unless a placement or an individual ad specifies otherwise. Add your preferred text (for example, “Advertisement” or “Sponsored Content”) in the global field.
By default, labels are rendered as plain text. If you want to style or format them, activate the option that lets AdPresso interpret basic HTML. When enabled, the label field accepts a curated list of tags, including:
This setting affects all label output across your site, including individual labels that override the global one.
AdPresso follows a clear, predictable hierarchy, giving you both control and consistency. The delivery logic is simple: a more specific label always overrides a less specific one.
Whenever an ad is delivered, AdPresso checks this hierarchy from top to bottom. A more specific setting always overrides a broader one, ensuring every unit gets the correct disclosure.
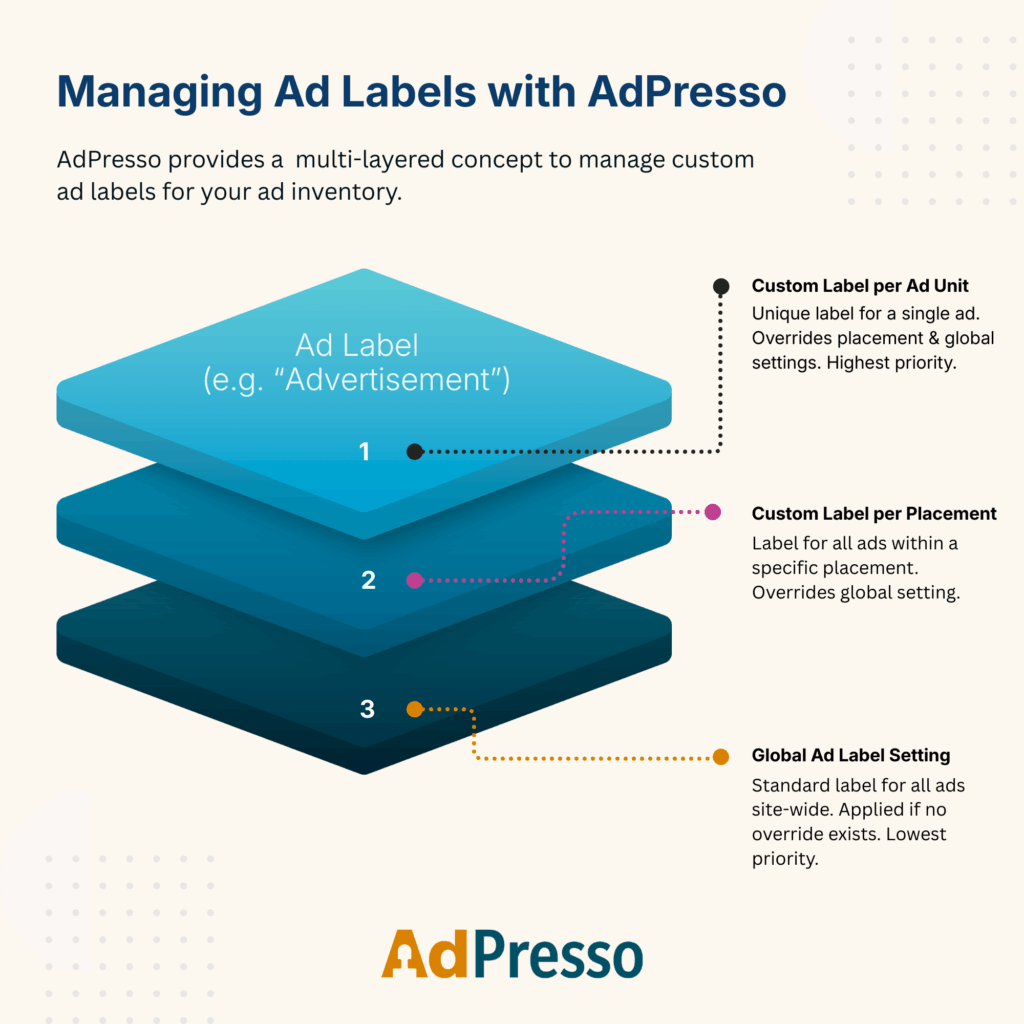
If you want a label that differs from your global default, you can override it either at the placement level or on the individual ad.
If you use ad groups such as rotators and the ads inside them include different ad-level labels, AdPresso will display all relevant labels to remain fully compliant. This ensures you never under-disclose mixed ad content.
To fine-tune the visual style or positioning of your labels, add custom CSS to your theme. The cleanest approach is WordPress Dashboard > Appearance > Customize > Additional CSS. You can also add it directly to your child theme’s style.css if preferred.
Before writing CSS, identify the correct class name. The prefix is defined in AdPresso under Settings > General > Output. For example, if your prefix is wpap, labels use the class .wpap-label. Replace wpap with your actual prefix in all code snippets of this manual.
For optimal user experience, ad labels should be compliant but not distracting. This example changes the color to a subtle gray and reduces the font size, ensuring the label blends well with the surrounding content while still fulfilling its purpose.
/* Styling the ad label to be subtle and professional */

.wpap-label {
    color: #6c757d; /* A neutral, dark gray color */
    font-size: 0.85em; /* Slightly smaller than the main body text */
}The alignment of the ad label should match the ad's context and the surrounding text flow. Here are the three most common alignment options:
| Alignment | Goal | CSS Code |
|---|---|---|
| Left-Aligned (Default) | Aligns the label with the content's reading start. | .wpap-label { text-align: left; } |
| Centered | Places the label centrally above the ad unit. | .wpap-label { text-align: center; } |
| Right-Aligned | Pulls the label to the right edge of the ad unit. | .wpap-label { text-align: right; } |
Sometimes, displaying the label below the advertisement is preferred for visual separation. This requires adjusting the ad wrapper's position (.wpap-top) and then placing the label (.wpap-label) absolutely below it.
To move the label below the ad content, use the following:
/* 1. Adjust the ad wrapper to be positioned relative */

.wpap-top {
    position: relative;
    padding-bottom: 25px; /* Creates space for the label below */
}

/* 2. Position the label element absolutely at the bottom */

.wpap-label {
    position: absolute;
    bottom: 0px; /* Aligns to the bottom edge of the wrapper */
    left: 0px;
}For sidebar layouts or visually striking formats, you can rotate the label vertically along the right border. This advanced technique uses CSS transforms (rotate) to orient the text and absolute positioning to place it on the right side, with the text running from bottom to top.
This code positions the label vertically on the right border of the ad:
/* 1. Ensure the wrapper allows absolute positioning */

.wpap-top {
    position: relative;
}

/* 2. Rotate and position the label vertically */

.wpap-label {
    position: absolute;
    top: 50%; /* Start rotation near the middle vertically */
    right: -10px; /* Adjust this value to place it right outside the border */
    transform: rotate(90deg); /* Rotates text 90 degrees */
    transform-origin: 0 0; /* Ensures rotation pivots correctly */
    font-size: 0.9em;
    color: #333;
}If you want your label to link to a page like “Advertise Here” or your media kit, you’ll need HTML enabled globally. Then simpy insert a label text that include the <a> tag.
<a href="https://yourwebsite.com/advertise-here" target="_blank" rel="noopener">ADVERTISE HERE</a>You can then apply standard CSS styling (e.g., to remove the underline) to the linked label using the combined selector:
/* Styles the linked label text */

.wpap-label a {
    color: #007bff; /* Link color */
    text-decoration: none; /* Removes the underline */
    font-weight: bold;
}